
Introduction: Get Your Salesforce Permissions Updated in Bulk!
Managing user permissions in Salesforce can feel overwhelming, especially if you’re an admin responsible for making sure everyone has the right level of access. Permissions control what users can see and do in Salesforce—whether it’s viewing customer details or updating important business data. Without a simple way to manage these permissions, things can quickly get messy, leading to mistakes, wasted time, or even security problems.
Salesforce provides some built-in tools for managing permissions, but they aren’t always easy to use. For example, making changes for a lot of users at once or reviewing who has access can take a lot of time and effort. This is where Excel and the Xappex XL-Connector can really make a difference.

Imagine a situation where your team needs to update permissions for 100 users because of a new project. Doing this one by one in Salesforce would take hours. With XL-Connector, you can pull all the user data into Excel, make the changes in bulk, and push it back to Salesforce—all in a few minutes. This combination of Excel and XL-Connector lets you easily view, edit, and audit permissions, all in one familiar place.
Use Case:
According to the use case shared by Rebecca Ralls, a Solution Architect at Coastal, using Xappex XL-Connector can save up to 24 hours every month thanks to its advanced Excel integration features.
By streamlining data management tasks, automating repetitive processes, and reducing manual errors, the XL-Connector significantly cuts down the time spent on typical Salesforce administration. These savings translate to over $50,000 per year in consultant costs, making it an invaluable tool for maximizing efficiency and reducing operational expenses.
Rebecca’s calculations show that even complex data operations, which would normally take hours, can be completed in minutes with XL-Connector, ultimately freeing up Salesforce consultants to focus on more strategic initiatives.
Throughout this guide, we’ll show you how to use XL-Connector and Excel together to make managing Salesforce user permissions easier and faster, so you can focus on more important tasks instead of getting stuck in complicated processes.
Let’s dive in by first understanding Salesforce user permissions and why they matter for your organization.
Understanding Salesforce User Permissions
Salesforce user permissions are essentially the rules that determine what different users can see, edit, or interact with within your Salesforce environment. These permissions are crucial for making sure that sensitive information is only accessible to those who need it. Properly managing these permissions also helps prevent accidental data modifications or unauthorized access to critical business information. For managing user permission in Salesforce effectively, understanding the basics is important.
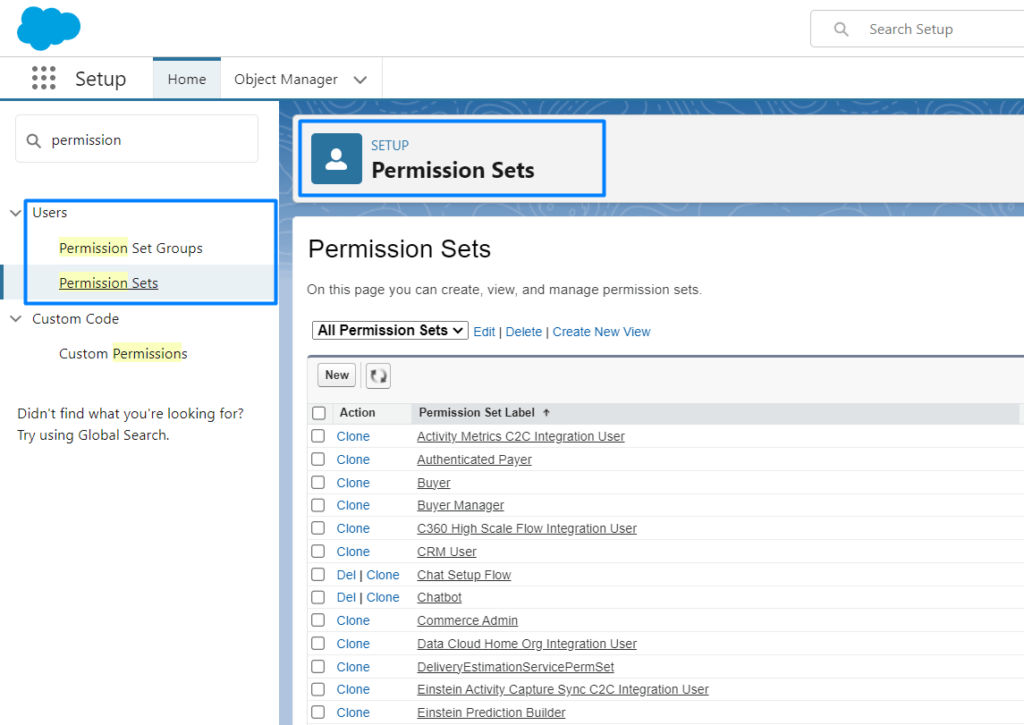
Permissions in Salesforce are managed through a combination of profiles and permission sets. Here’s a quick breakdown:
- Profiles:
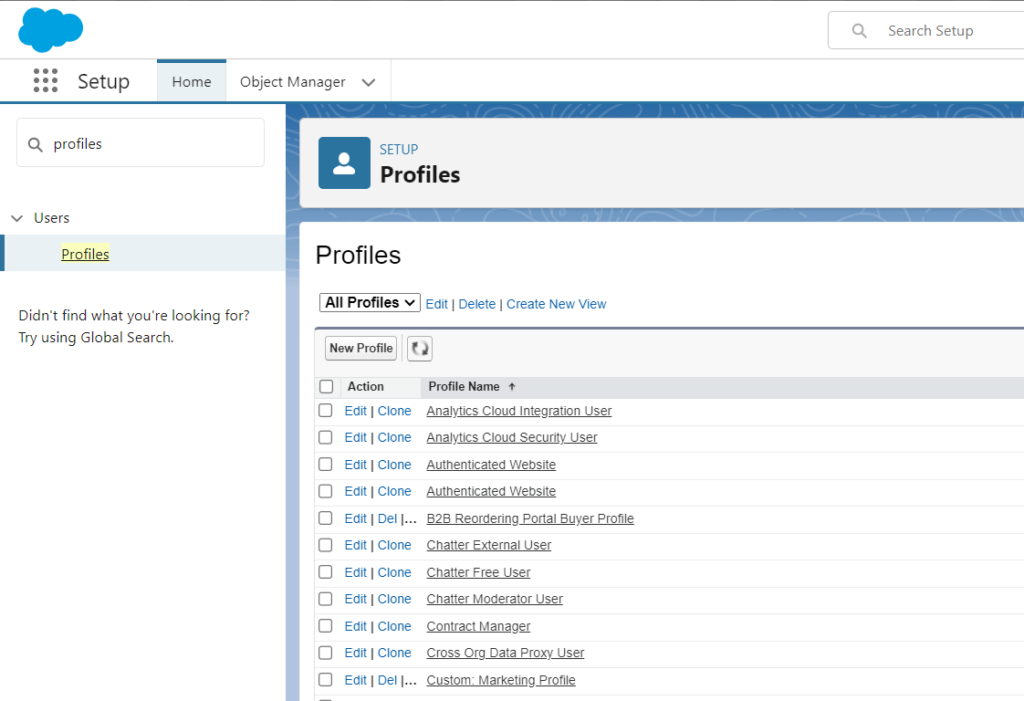
Every Salesforce user has a profile. Profiles define the baseline permissions for users, like what they can do with records, objects, and fields. For example, a Sales Representative might have a profile that allows them to view and edit lead records but not delete them. This is useful for situations where you need to do a Salesforce view all users permission or handle Salesforce object permissions for all profiles.
Insight:
Salesforce has postponed the end of life (EOL) of permissions on profiles originally planned for Spring ’26. They will not enforce a fixed EOL date until more improvements are made to the admin experience.
Profiles will still exist for managing things like login hours and defaults for record types and apps. However, permissions (e.g., object permissions, field-level security, tabs, etc.) will eventually be managed only through permission sets and permission set groups.
Admins should start moving to permission sets to get ready for these changes. This will provide more control and flexibility in managing user roles. Salesforce is also working on User Access Policies to help make the transition easier.
For more details, check the full update here.
- Permission Sets: Permission sets allow you to give additional permissions to users without changing their profile. This is useful when you want to grant specific permissions to a select group of users. For instance, if some sales team members need access to marketing data, you can assign them a permission set that grants this access without modifying the entire sales profile. This makes it easier to manage user permissions without altering their entire setup.
- Object and Field Permissions:
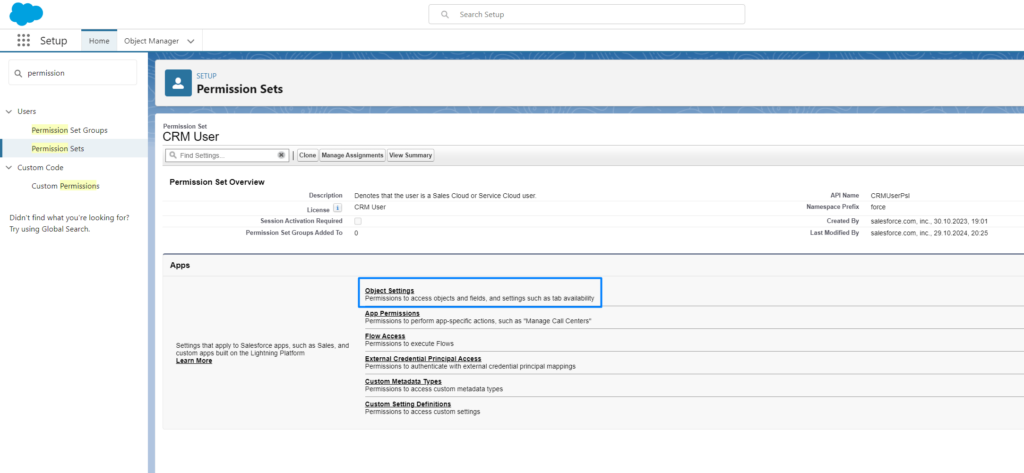
Permissions can also be set at the object and field level. This allows admins to control who can view, edit, or delete specific types of data or even particular fields within a record. This is crucial for Salesforce audit field permissions and ensuring compliance with Salesforce security audit requirements.
Understanding these permission levels is key to maintaining security and ensuring that each user has just the right level of access. Proper user permissions management is also vital for compliance and ensuring that sensitive data remains secure. Using tools like Excel, combined with the Salesforce connector for Excel, allows you to streamline managing permissions across multiple users.
For those who want to explore more about the benefits of using XL-Connector, check out the Xappex XL Connector review and how it stands against other tools in Excel to Salesforce connectors.
Insight:
For those, who want to get a summary of the XL-Connector, here is a list of top XL-Connector features that make your heart beat faster:
- Seamless Data Import and Export from Salesforce to Excel
- Bulk Data Operations (Insert, Update, Delete)
- Data Upsert
- Using Excel Formulas with Salesforce Data
- Offline Work Capability
- Mass Download and Upload of Attachments and Files
- Manage Salesforce Scoping and Restriction Rules
- Bulk Upload Multiple Related Records
- Dynamic UI Adjustments via Customer Portal
- Mass Managing Salesforce Fields and Field-Level Security
- Automating Data Loads with XL-Connector Flows
- Converting Leads in Bulk
- Loading Custom Metadata
- Using Custom Formulas to Dynamically Pull Data
- Validating Dependent Picklists
- Uploading Files to Salesforce
- VBA and Advanced Automation:
- Analyzing Field Utilization Across Layouts
- Generating Visualforce Pages from Page Layouts
- Removing Duplicate Records
- Bringing Picklist Values into Reports
In the next section, we’ll explore why using Excel is a smart choice for managing these permissions, especially when you have many users to consider. We’ll also cover best practices for conducting a Salesforce security audit report using Excel to ensure your permissions are optimized.
Setting Up XL-Connector for Permission Management

To start managing Salesforce user permissions with Excel, you need to set up the XL-Connector correctly. This involves installing the addon for Excel, and connector for Salesforce, configuring it for your Salesforce environment, and preparing your Excel sheet for optimal use. Below, we’ll guide you through the entire process to ensure you’re set up to manage permissions effectively.
1. Install the XL-Connector
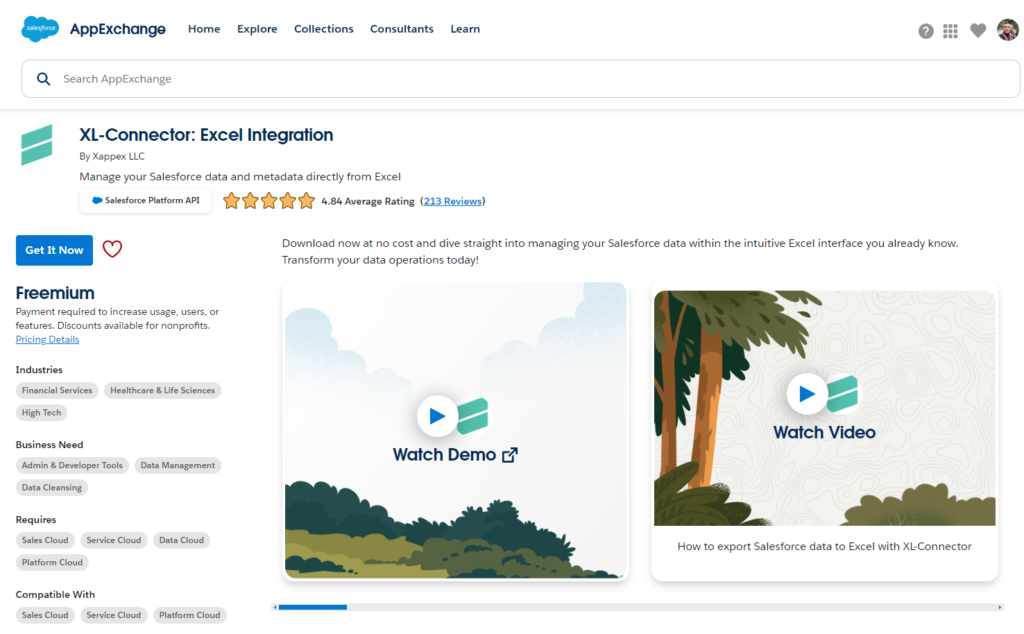
First, you’ll need to install the XL-Connector. The Xappex XL-Connector is available on Salesforce AppExchange, and installation is straightforward.
Instal add-on for Excel:

You’ll need to follow the installation prompts provided on the page to connect it to your Salesforce instance. After installation, you should see the connector as an add-on in Excel.
2. Configure XL-Connector for Salesforce Integration
Once installed, it’s time to configure the connector to work with your Salesforce environment. You will need appropriate permissions to integrate Salesforce with an external app, which might require admin-level access. Log in to Salesforce through the connector to establish the link between Excel and your Salesforce data.
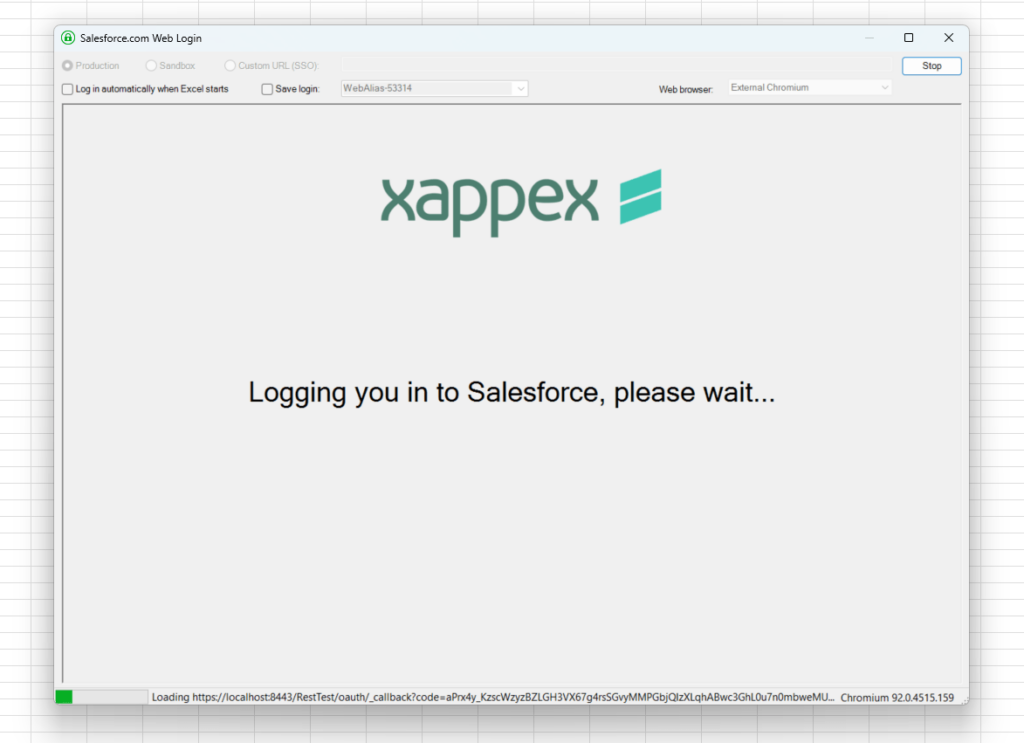
After successfully logging in, you can select the Salesforce objects you need to work with—this includes user permissions, profiles, and permission sets. For example, you could pull all user profiles into Excel to create a Salesforce view all users permission table, making it easy to review and update permissions.
3. Prepare Your Excel Sheet
With the connector configured, it’s time to prepare your Excel sheet. Start by importing the necessary data from Salesforce—like user records and their corresponding profiles or permission sets. This will create a detailed list view that you can filter, sort, and edit as needed.
You can create a list view permissions Salesforce table that makes it simple to see who has access to what. This data can then be used to make quick changes for compliance purposes, such as performing a salesforce security audit or editing salesforce object permissions for all profiles in bulk.
4. Mass Update Field-Level Security in Salesforce
Using XL-Connector, you can also manage object-level and field-level security for different objects across multiple profiles or permission sets. Follow these steps to perform mass updates efficiently:
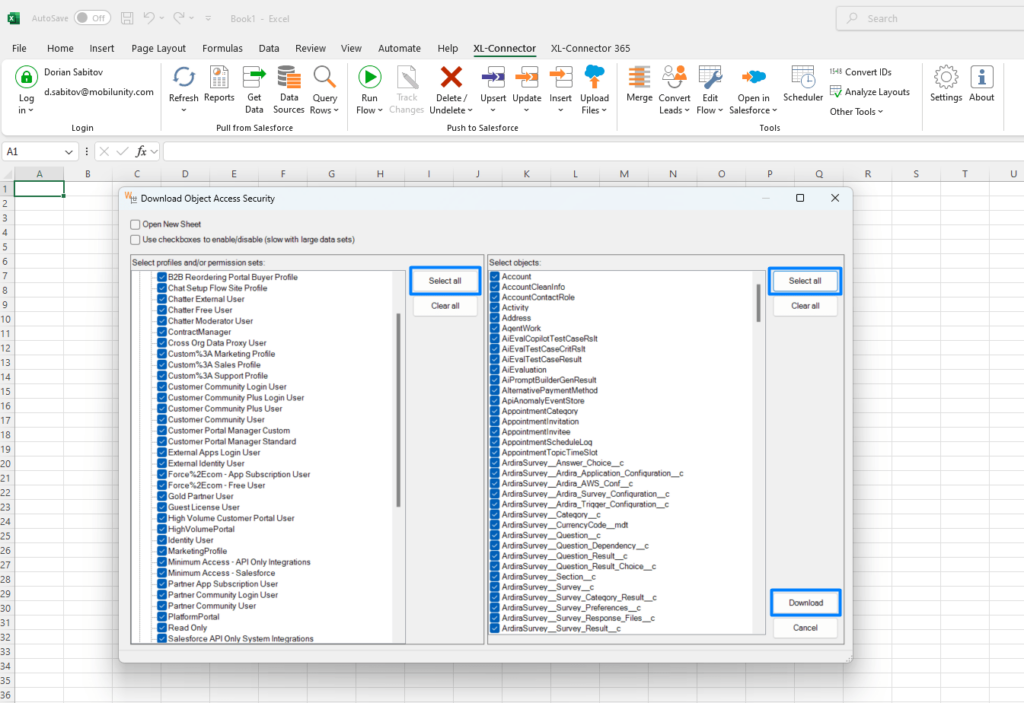
- Step 1: Click on the Other Tools -> Manage Object Access Security menu item in XL-Connector to start the process.
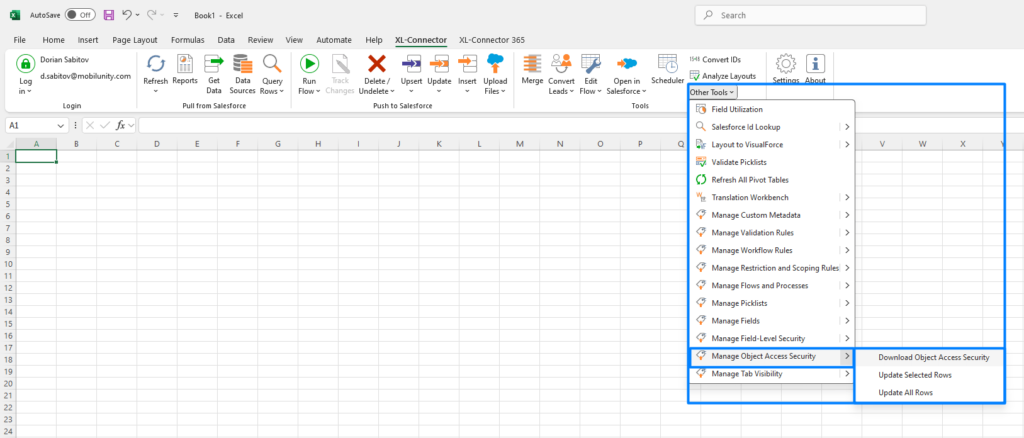
- Step 2: A dialog box will be displayed to download object-level security settings for any profile or permission set combination in your Salesforce org.
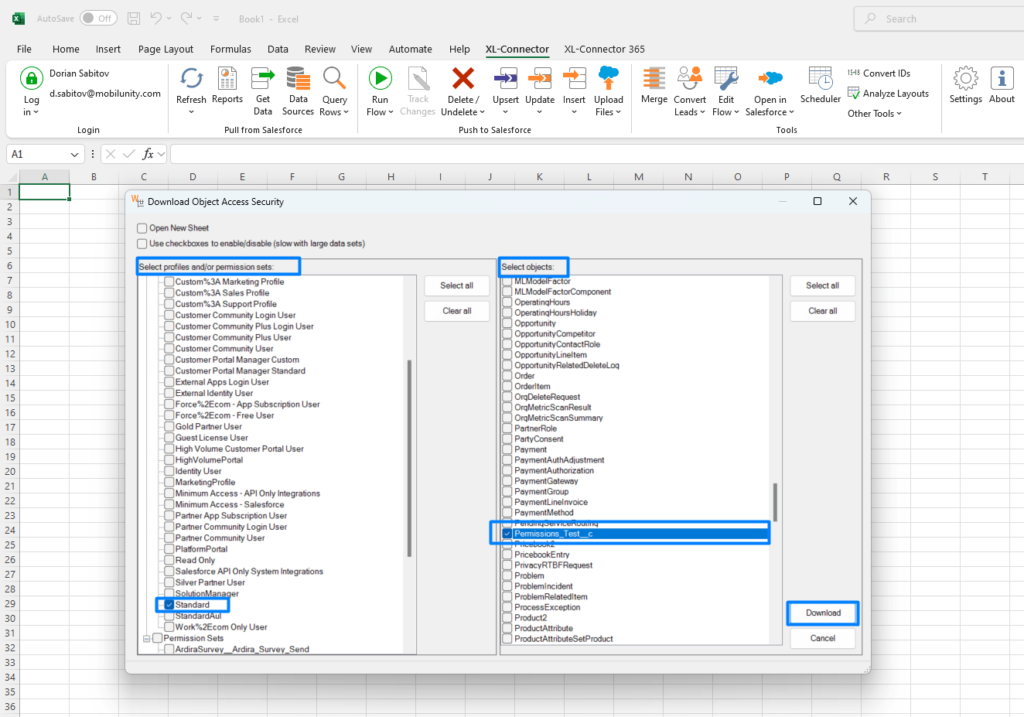
This allows you to see which objects are visible or editable for specific profiles. You can download all object-level security settings as needed. In my case, I selected a Standard User Profile and custom object Permissions_Test__c
- Step 3:
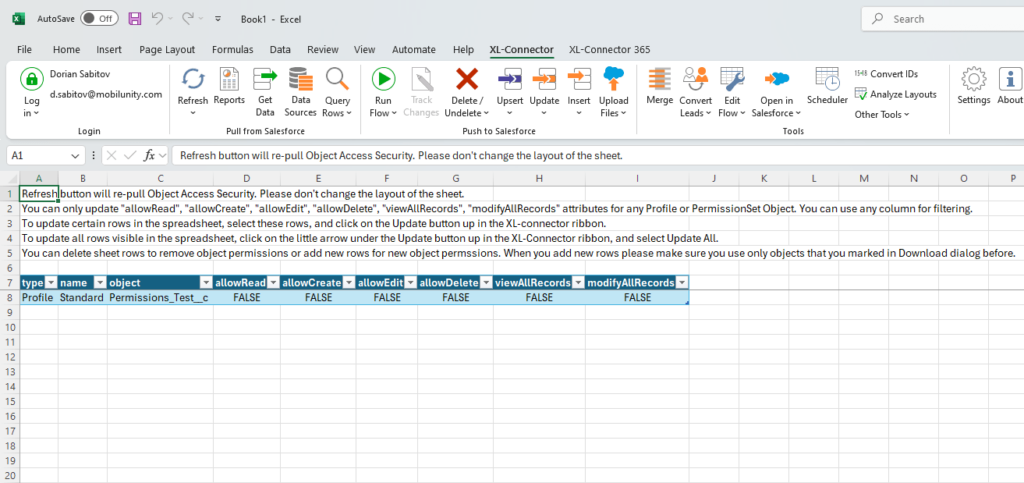
Once the settings are downloaded, all selected profiles and objects will appear in your Excel spreadsheet, allowing you to easily edit field-level security directly within the spreadsheet.
- Step 4:
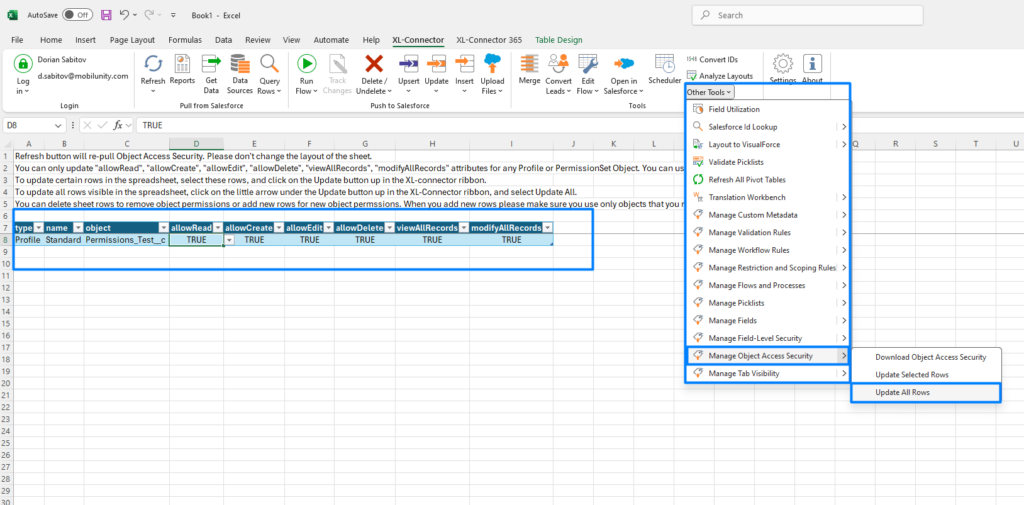
Click the Update All Rows button in the Other Tools -> Manage Object Access Security XL-Connector ribbon to re-pull the most up-to-date field-level security settings from Salesforce.
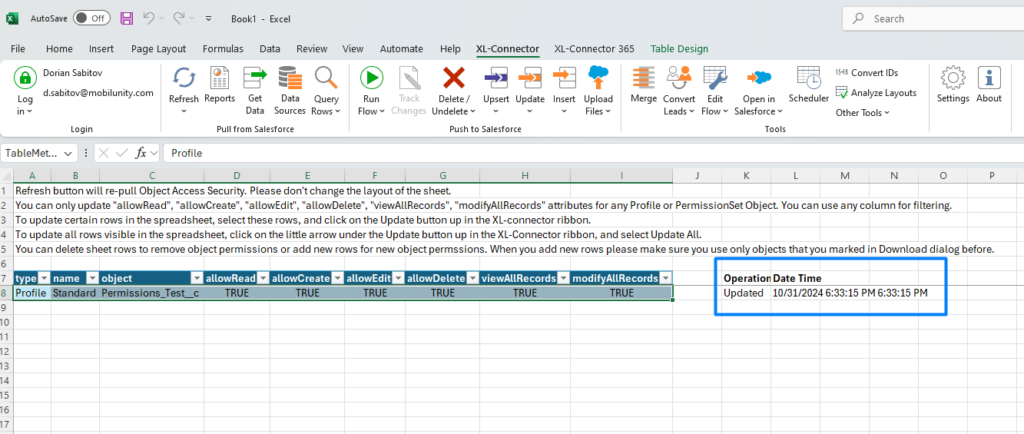
- Step 5: Check all changes in Salesforce
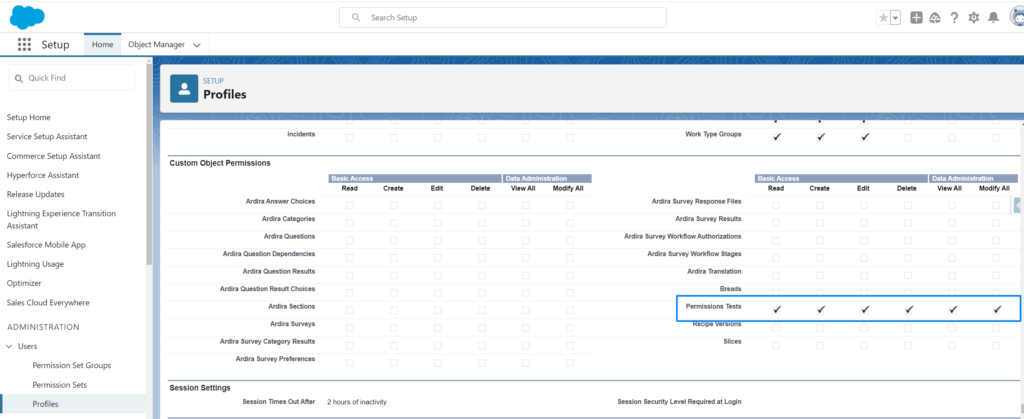
Using these steps, you can make sure field-level security is adjusted to align with your organizational requirements effectively and without a lot of manual work.
5. Test the Setup
Before making large-scale changes, it’s important to test the integration. Make a small edit, such as updating permissions for a single user, and push this change back to Salesforce. Confirm the changes in Salesforce to ensure everything is synced correctly.
Once you’re confident that everything is working as expected, you can move on to making larger-scale changes, such as performing a salesforce audit field permissions update or creating salesforce audit report documentation.
In the next section, we’ll dive into how to effectively manage and edit user permissions using Excel, including best practices to avoid common pitfalls.
Managing and Editing Salesforce User Permissions Using Excel
Now that you have set up XL-Connector and prepared your Excel sheet, it’s time to dive into how to effectively manage and edit Salesforce user permissions using Excel. This section will provide you with practical steps, tips, and best practices to avoid common pitfalls while managing Salesforce permissions.
1. Importing User Permissions for Bulk Editing
To effectively manage Users permission Salesforce, start by using XL-Connector to pull all the relevant user permissions data into Excel. This may include profiles, permission sets, and field-level security data. Having all this data in one spreadsheet allows for easy comparison and editing.
- Step 1: In the XL-Connector ribbon, click on the Other Tools -> Manage Object Access Security menu item to start managing object access security.
- Step 2: Select the object, such as user profiles, that you need to import. This could also include other permission-related objects like permission sets or field-level security settings.
- Step 3: Once imported, use Excel’s filtering and sorting features to identify and organize the permissions you need to edit. You can create a list view permissions Salesforce table to make the data more manageable.
2. Making Bulk Edits
With your data imported into Excel, you can now make changes to the permissions as needed. For example, you might need to update Salesforce edit object permissions for all profiles if there’s a new compliance requirement or change in company policy. So you can select all profiles and all objects.
- Step 1: Identify the rows you want to edit based on your requirements.
- Step 2: Make the necessary changes to fields such as visible or read-only for specific profiles and permission sets.
- Step 3: Once edits are complete, select the rows you want to update and use the Update or Update Selected button in the XL-Connector ribbon to push these changes back to Salesforce.
3. Creating and Managing Dynamic List Views
Creating a dynamic list view Salesforce in Excel can help you easily monitor and track user permissions. You can use Excel’s features to create views that show only specific types of permissions—such as those that need urgent updates or have been recently changed.
- Use filtering tools to create custom views that highlight potential security gaps.
- Sort permissions by profiles to see at a glance who has access to sensitive data.
4. Using Excel for Salesforce Security Audit and Compliance
Excel is an excellent tool for conducting a Salesforce security audit report. By importing all relevant permissions into one place, you can easily identify inconsistencies or areas where permissions are too broad. This helps ensure that all users have the appropriate level of access.
- Step 1: Import permissions data such as profiles, permission sets, and field-level security.
- Step 2: Use Excel’s pivot tables to summarize permissions and identify patterns that might indicate a problem.
- Step 3: Document findings in a salesforce audit report to share with your team.
5. Best Practices for Managing User Permissions
- Regular Audits: Conduct regular audits using Salesforce audit tools to ensure that permissions align with current business needs and compliance requirements.
- Document Changes: Always keep records of changes made to user permissions. This helps maintain transparency and is essential for compliance. Use Excel to maintain detailed change logs that can serve as a Salesforce audit report.
- Start Small, Then Scale: Test changes on a small group of users before making large-scale updates. This helps you identify any issues before they affect a larger audience.
By following these steps and best practices, you can ensure that your Salesforce permissions are always up-to-date, secure, and compliant.
Conclusion: Streamline Your Salesforce Permissions with Ease
Managing Salesforce user permissions can be challenging, especially when you need to manage user permission Salesforce for large teams and multiple layers of access. However, by leveraging Excel and the powerful Xappex XL-Connector, you can make handling permissions much simpler. The ability to bulk edit, organize, and track permissions using a familiar tool like Excel makes your job as an admin far more efficient and less prone to errors.
With XL-Connector, you can easily manage users permission Salesforce and create Salesforce list view permissions, which are key to simplifying your workflows. Using Excel, you can generate a list view permissions Salesforce table that helps you see who has access to what. Additionally, you can generate dynamic list view Salesforce views that make it easy to identify areas that need attention, allowing you to quickly update permissions for specific users or profiles.
For a more organized approach, XL-Connector also helps you perform a Salesforce security audit by providing a clear overview of all permission settings. It allows you to generate a Salesforce audit report and use various Salesforce audit tools to ensure your environment is secure. You can audit fields in Salesforce and make sure that permissions are set appropriately for different profiles. This functionality ensures that when you perform a Salesforce audit field permissions review, your data remains compliant and secure.
One of the most useful features of XL-Connector is the ability to perform bulk updates, such as Salesforce edit object permissions for all profiles. This can save you countless hours compared to manual editing. You can even pull all user profiles into Excel to create a Salesforce view all users permission overview, making it easier to manage and modify access across the entire organization.
The key to effective Salesforce management user permission practices is preparation and regular review. By following the steps in this guide—from setting up XL-Connector to creating dynamic views, editing user permissions in bulk, and performing regular security audits—you can ensure your Salesforce environment remains secure and efficient. Performing a Salesforce security audit report regularly, using Salesforce audit tools, and keeping detailed records of changes will help prevent unauthorized access and keep your data compliant with business needs.
Incorporating these tools into your Salesforce management strategy will not only save you valuable time but also keep your system organized and secure. Whether you are preparing for a Salesforce security audit or looking to make day-to-day management more efficient, using Excel with XL-Connector provides a powerful solution to help you work smarter, not harder.
Take the leap into simplified permission management today—empower yourself and your organization to work more effectively with Salesforce and Excel.

Dorian is a 6X Certified Salesforce Developer and Administrator with a start in the IT world as a CRM Admin in 2020. Since diving into Salesforce in 2021 via Trailhead and Focus on Force, he has achieved a Ranger Rank, earned several Superbadges, and bagged certifications including the Salesforce Certified Administrator, Platform App Builder, Associate and Platform Developer I by 2023. In 2024 he also became Salesforce Certified AI Associate and earned Certified AI Specialist Certification in 2025. Dorian is very keen on continuous learning, always looks for fresh ways to improve his knowledge. He enjoys running, boxing, kickboxing and reading diverse kinds of books in his free time.


 Previous Post
 Next Post