
Einstein in Salesforce
Salesforce Einstein is a game-changer in CRM, bringing the power of AI to your fingertips. It transforms Salesforce by adding smart features like predictive analytics, which help users make better decisions. When you use Einstein in Salesforce, it simplifies and improves your CRM tasks, making them more tailored and efficient. This tool is all about smarter CRM management, helping you understand your customers better and respond more effectively to their needs.
With Einstein, you can easily see patterns in customer behavior. For example, it can help you figure out which leads are most likely to buy your product. This way, you can focus your efforts on the right customers and provide them with what they want. Einstein also helps you save time by automating tasks, so you can spend more time building relationships with your customers. Overall, using Einstein in Salesforce makes your work easier and helps your business grow.

Image Source: Salesforce News & Insight
Insight:
How to Use Einstein in Salesforce – an article where can be found a detailed overview of Salesforce and Einstein AI.
Top 10 Salesforce Einstein Questions and Answers
- Q1: How to Enable Einstein in Salesforce?
- Q2: How to Integrate Einstein into Salesforce?
- Q3: How to Assign an Einstein License in Salesforce?
- Q4: How to Run a Report in Salesforce Einstein?
- Q5: How to Get Today's Date in Salesforce Einstein?
- Q6: How to Show Rich Text from Salesforce to Einstein Without HTML Tags?
- Q7: How to Display Data in One Field Based on the Value of Another Field in Salesforce Wave Einstein?
- Q8: How to Set Emails to Private in Einstein Activity Sync Salesforce Inbox?
- Q9: How to Use Einstein GPT in Salesforce?
- Q10: How to Enable Salesforce Einstein Analytics for Users?
Q1: How to Enable Einstein in Salesforce?
Enabling Salesforce Einstein in your CRM system involves a few key steps, which can vary slightly depending on the specific Einstein feature you want to activate. Here’s a general overview of the process, based on the information from Salesforce’s Help and Salesforce Community:
- Check License Availability: Before enabling Einstein features, it’s essential to verify if your Sales Cloud, Service Cloud, or Lightning Platform license includes Einstein capabilities. Not all Salesforce editions come with Einstein features, and some may require additional licensing.
- Access Setup in Salesforce: To begin the enabling process, you’ll need to access the ‘Setup’ area in your Salesforce account. This is where you’ll find most of the tools and options for configuring and managing Einstein features.
- Navigate to Einstein Features: In the Setup section, use the Quick Find box to search for ‘Einstein’. This will bring up various options related to different Einstein features. The exact name and location might vary depending on the specific feature you’re interested in, such as Einstein Forecasting, Einstein Analytics, or Einstein Activity Capture.
- Follow the Guided Setup Process: Salesforce typically provides a guided setup process for each Einstein feature. This step-by-step guide will walk you through enabling the feature and configuring it according to your business needs. It may include accepting terms and conditions, defining criteria for models (like in Einstein Forecasting), and assigning permissions to users.
- Assign Permissions to Users: After enabling the Einstein feature, you may need to assign the appropriate permissions to your Salesforce users. This allows them to access and utilize the Einstein capabilities you’ve activated.
- Customize and Configure Further: Depending on the feature, you might have additional customization and configuration options to better align the tool with your specific business processes and data.
Remember, each Einstein feature may have its specific requirements and steps for activation. Therefore, it’s recommended to refer to Salesforce’s official documentation for the feature you’re interested in. This will ensure you have the most accurate and detailed instructions.
You can visit the Salesforce AppExchange market to find the best plugins to work with Salesforce Einstein and enhance its features, more detailed information can be found in the article about Salesforce Sales Analytics.
Insight:
Check whether your Sales Cloud, Service Cloud, or Lightning Platform license includes any Einstein features. Be aware that using these included features might be subject to usage limits and require agreeing to extra terms.
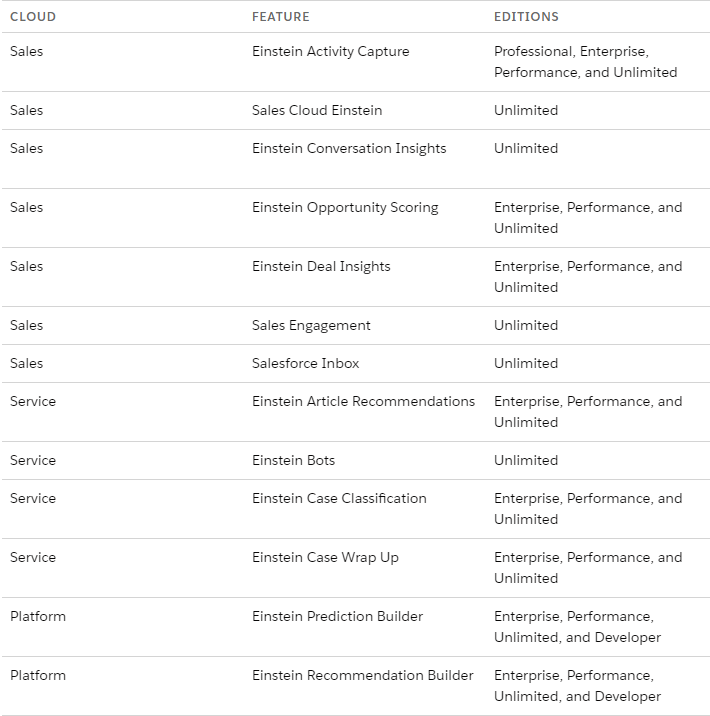
Image Source: Turn Einstein Features On or Off
Related Resources:
- Salesforce Help How to Enable and Disable Einstein Features
- Salesforce Help Enable Einstein Forecasting
- YouTube How to Set Up Einstein Search in Salesforce – Tips for Salesforce Administrators
- Salesforce Help Enable or Disable Einstein Activity Capture
- Salesforce Help Set Up Sales Cloud Einstein
Integrating Einstein into Salesforce
Integrating Salesforce Einstein into your CRM system significantly enhances its capabilities, transforming Salesforce from a powerful CRM tool into an AI-driven, predictive, and insightful platform. This not only adds new features but also fundamentally changes how your business interacts with customer data, enabling more informed decisions through predictive analytics and intelligent automation. Such integration is crucial for staying competitive in the digital landscape.
Don’t forget to visit the Salesforce AppExchange marketplace and find the best plugins to work with Salesforce Einstein and enhance its features, more detailed information can be found in SF App Exchange.
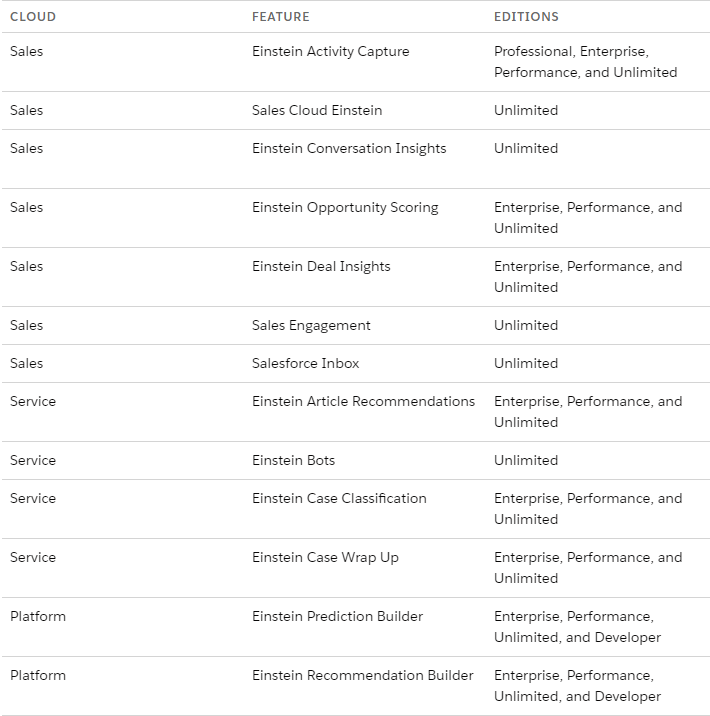
Q2: How to Integrate Einstein into Salesforce?
The integration process typically involves several key steps:
- Check Compatibility and Licenses: Ensure that your Salesforce edition is compatible with Einstein and that you have the necessary licenses.
- Access Salesforce Setup: Go to the ‘Setup’ area in your Salesforce account. This is where you will manage most of the configuration settings for Einstein.
- Find Einstein Features: Use the Quick Find box in Setup to search for ‘Einstein’. You will see various options related to different Einstein features.
- Use the Einstein Setup Assistant: Salesforce provides a guided setup process for each Einstein feature. This step-by-step guide will help you through enabling and configuring the feature according to your business needs.
- Customize and Configure: Depending on the feature, there might be additional customization and configuration options. This could involve defining criteria for models, such as in Einstein Forecasting, or setting up Einstein Bots.
- Assign User Permissions: After enabling the Einstein feature, assign the appropriate permissions to your Salesforce users to allow them to access and utilize the Einstein capabilities.
- Testing in Sandbox: Before applying changes to your live environment, test the features in a sandbox. This helps understand how Einstein features will work with your existing architecture and workflows.
- User Training: Ensure user adoption by training users on how to use the new features and monitoring their usage to ensure they are getting the most out of Einstein.
- Ongoing Management and Optimization: Continuously monitor the performance of Einstein features and make adjustments as needed. This may involve retraining AI models, updating configurations, or modifying user permissions.
Insight:
Remember, each Einstein feature may have specific requirements and steps for activation, so it’s recommended to refer to Salesforce’s official documentation for detailed instructions. For specific features like Einstein Bot, there are specialized guides available that provide a step-by-step approach to setting up and deploying the bot within your Salesforce environment.
Integrating Einstein into Salesforce is not just about activating features; it’s about tailoring these advanced AI capabilities to align with your business processes and goals. This integration allows businesses to leverage predictive insights, automate routine tasks, and gain a deeper understanding of their customer data, ultimately leading to more informed decision-making and strategic planning.
Related Resources:
- Salesforce Help Marketing Cloud Einstein and Analytics
- Salesforce Video Integrating With Einstein Analytics
- YouTube CRM Integration: Salesforce – Einstein GPT
Assigning Einstein Licenses in Salesforce
Giving out Salesforce Einstein licenses to users is an important step. It means you’re giving your team the power to use cool AI features that Einstein has. These licenses let users look at data to make smart choices, guess what customers might do next, and make some of their harder work easier. This helps make everything run smoother and smarter when it comes to managing customer relationships. Let’s look into the best ways for admins to give out these licenses.
Q3: How to Assign an Einstein License in Salesforce?
To assign Einstein licenses in Salesforce, follow these simplified steps:
- Go to ‘Setup’: Log in to your Salesforce account and click on ‘Setup’, usually found in the top right corner.
- Access ‘Users’: Inside the Setup menu, look for the ‘Users’ section. You might have to scroll down or use the Quick Find search box.
- Choose Users: In the Users section, you’ll see a list of your team members. Pick the ones who need the Einstein licenses.
- Edit Permissions: Click on a user’s name to edit their profile, then find the ‘Permission Set Licenses’ section.
- Assign Licenses: Here, you can add Einstein licenses to each user. Just check the boxes next to the Einstein options.
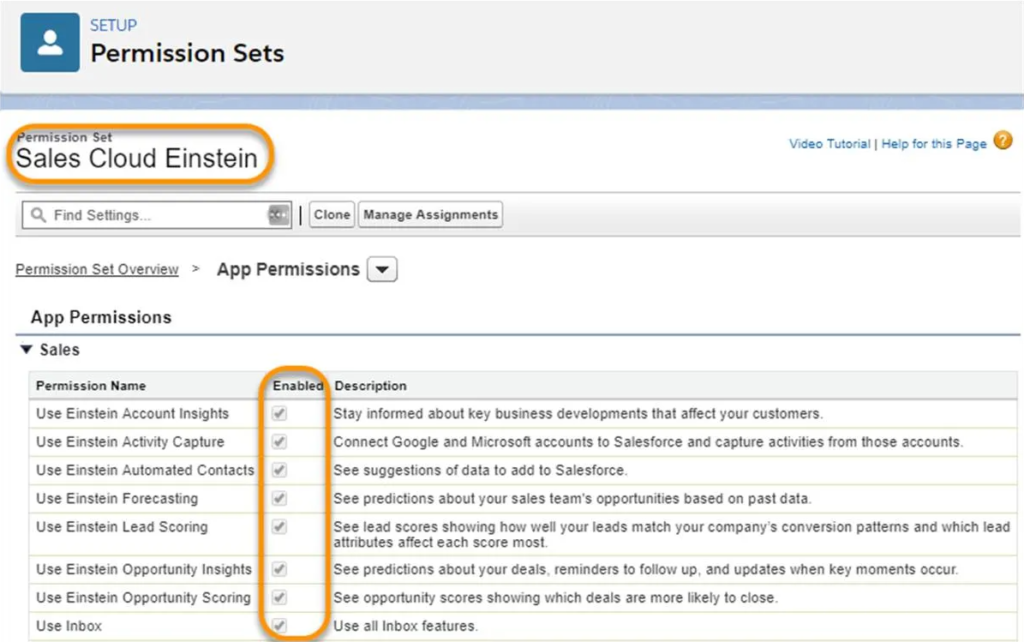
Image Source: Salesforce Trailhead Start Using Sales Cloud Einstein
Related Resources:
- Salesforce Help Assign Licenses to Users
- YouTube How to Create an Einstein Search Permission Set in Salesforce
- Salesforce Help Select Who Can Use Sales Cloud Einstein
- YouTube How to Add a Permission Set to a Salesforce User
Running Reports in Salesforce Einstein: Unleashing the Power of Data Analysis
Running reports in Salesforce Einstein is about tapping into AI for deeper insights and smarter decision-making. With Einstein Analytics, users can analyze data from Salesforce and other sources, visualize it, and get predictive analytics to inform their decisions. The platform includes tools for data exploration like Reports and Dashboards, Discovery, Prediction Builder, and more. It’s designed to help sales teams by providing real-time insights, understanding customer behavior, and predicting outcomes for smarter actions. To get started, ensure your data is accurate and reliable, then integrate Einstein Analytics into your sales workflow to make it truly effective.
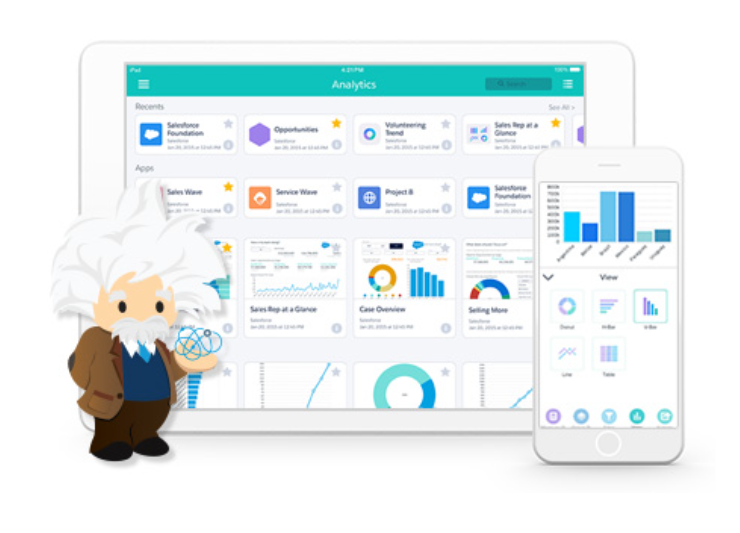
Image Source: Einstein Analytics
Q4: How to Run a Report in Salesforce Einstein?
Creating and running reports in Salesforce Einstein is a multi-step process that taps into the platform’s AI analytics for in-depth insights:
- Open Reports Tab: In Salesforce, find and click on the ‘Reports’ tab to start.
- Create or Modify Reports: You can choose to set up a new report or alter an existing one to fit your requirements.
- Select Report Type: Choose the type of report you need, considering what insights and data you are looking to analyze.
- Customize with Einstein Features: Utilize Einstein’s predictive fields, insights, and recommendations to enrich your report. This could involve adding filters, groupings, and calculations that are supported by AI analytics to help you forecast trends and customer behavior.
- Review and Run the Report: Once your report is customized, review it for accuracy and run it to gather the data you’ve configured.
- Interpret the Data: After running the report, take the time to interpret the data. Einstein’s AI capabilities can help highlight important trends and patterns that may not be immediately obvious.
It’s important to note that, as of the latest updates, you’ll need to ensure your data is clean, accurate, and reliably integrated from various sources to make the most out of Einstein Analytics.
Visit the Salesforce AppExchange market and search plugins to work with Salesforce Einstein and Salesforce Reports & Dashboards, more detailed information can be found in our Salesforce CRM Dashboard guide.
Information about other related Reporting and Dashboarding in Salesforce can be found in:
- Salesforce KPI Dashboard Guide
- Call Center KPI Dashboard Guide
- Sales KPI Dashboard Guide
Related Resources:
- Salesforce Help Analyze Reports with Einstein Discovery for Reports
- Salesforce Videos How To Go From Salesforce Reports To Einstein Analytics
- YouTube Native Reports and Dashboards with Einstein Activity Capture
- Salesforce Help Analyze Sales Cloud Einstein Data with Reporting
- Salesforce Help Einstein Reports
Navigating Date Functions in Salesforce Einstein: Mastering Time-Sensitive Data
Using date and time functions in Salesforce Einstein allows for sophisticated data manipulation and is critical for timely analytics. These functions can help with sorting, filtering, and grouping data, which is essential for activities like sales tracking and forecasting. For instance, the DATEVALUE function converts date/time to date values, useful for extracting specific date components like the year. The DATETIMEVALUE function does the reverse, converting date values to date/time.
Q5: How to Get Today’s Date in Salesforce Einstein?
To use today’s date in Salesforce Einstein for reports and data analysis:
- Access the Formula Field: In your report or dataset, locate the formula field where you want to insert today’s date.
- Apply the TODAY() Function: Use the TODAY() function, which provides the current date dynamically.
- Ensure Data is Current: This ensures your analysis or report reflects the most recent information.
For guidance on using date functions, check Salesforce’s formula field documentation. For more advanced techniques, explore resources on time-sensitive data handling in Salesforce. Remember, clean and current data is key for accurate time-based reporting.
Related Resources:
- Salesforce Help DATETIMEVALUE
- Salesforce Help DATEVALUE
- Salesforce Help TODAY
- Salesforce Trailhead Use Date, Date/Time, and Time Formulas
- YouTube How to Setup Last Activity Date for Einstein Activity Capture
- Salesforce Help Using Date, Date/Time, and Time Values in Formulas
Handling Rich Text in Salesforce Einstein: Displaying Data Without HTML Tags
Displaying rich text from Salesforce in Einstein without HTML tags is a process that involves removing HTML formatting to present data in a clear, user-friendly format. While the exact official Salesforce step-by-step process is not available, it typically involves using specific functions or methods in Salesforce to strip out HTML tags from rich text fields. This process is vital for clarity in reports and dashboards where HTML tags can clutter and confuse the presented information.
Q6: How to Show Rich Text from Salesforce to Einstein Without HTML Tags?
To display rich text from Salesforce in Einstein without HTML tags, follow these steps, updated with the latest information:
- Use a Flow to Remove HTML: Create a flow in Salesforce that uses an Apex class specifically designed to remove HTML markup from rich text fields.
- Add Decision Element in Flow: Include a decision element in your flow to check if the text field (like a deal analysis field) has more than 0 characters.
- Call Apex Class to Remove HTML Markup: In the flow, add an action to call an Apex class that can strip out HTML tags from the rich text field.
- Update Records: Use the ‘Update Records’ element in your flow to update the record with the cleaned text.
- Activate the Flow: Once your flow is set up and tested, activate it. Now, whenever a business user updates the relevant rich text field, the flow will automatically store the plain text in a designated field.
- Handle Unsupported HTML in Flow Builder: Some HTML tags are not supported in Flow Builder and running flows. It’s recommended to avoid these or use Lightning Components for complex HTML.
- Use Lightning Components for Rich HTML: If you need to display rich HTML with full styling in your Salesforce flows, consider using Lightning Components. They provide full access to standard HTML used by modern browsers.
Remember, these steps involve some technical configurations in Salesforce, so it’s important to have a good understanding of Salesforce’s flow and Apex classes. For the most up-to-date information and detailed instructions, refer to Salesforce’s official documentation or resources like the Trailblazer Community.
Related Resources:
- Salesforce Help Rich Text Area Field Considerations
- Salesforce Trailblazer Community Rich text field in Salesforce Einstein Analytics/ Tableau CRM
- Salesforce Help Editing Rich Text Area Fields in Records
- Salesforce Help Fields: HTML in Labels Rendered as Plain Text and Management for Deleted Fields Available in Lightning Experience
Dynamic Data Display in Salesforce Wave Einstein
CRM Analytics, previously known as Einstein Analytics and Wave, is distinct from Tableau, another analytics platform acquired by Salesforce. This rebranding to CRM Analytics helps avoid confusion between the two products, with CRM Analytics being an integral part of the Salesforce ecosystem and Tableau serving as a separate, comprehensive analytics solution. Both platforms enhance Salesforce’s offerings in the analytics market, each with unique features and capabilities. A comparison of the two best BI Analytics tools can be found in Qlikview vs Salesforce Wave Analytics.
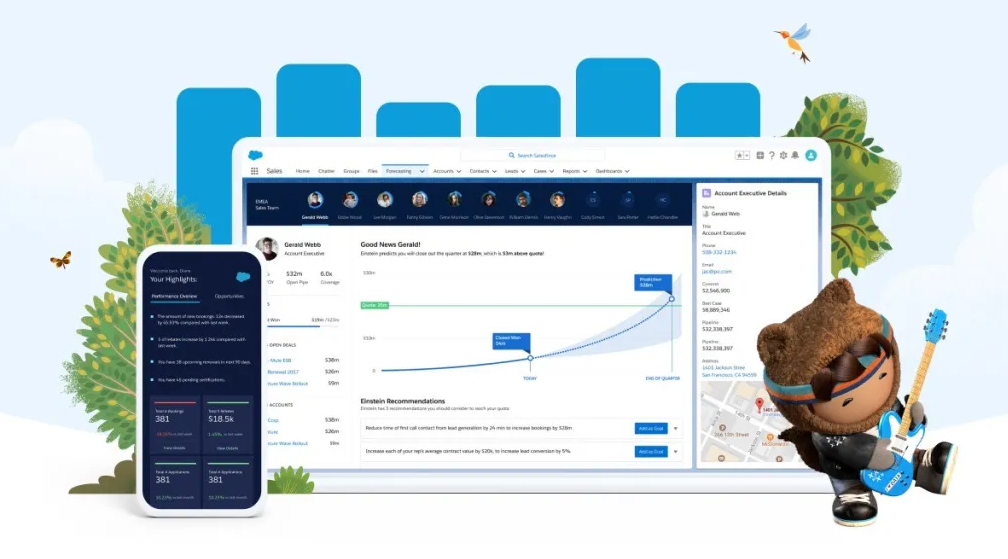
Image Source: Salesforce News & Insights
Displaying data in Salesforce CRM Analytics involves using dashboards that combine data visualizations and comparisons to tell a multifaceted story about your business from different angles. These dashboards are interactive, allowing you to explore by clicking on displayed elements, use filters to narrow down data, and view details in tables. You can track the activities of sales, service, and marketing personnel, and collect and distribute insights to your team. The dashboards in CRM Analytics can present both high-level and detailed views, with capabilities to apply filters, drill down into data, and explore data behind charts.
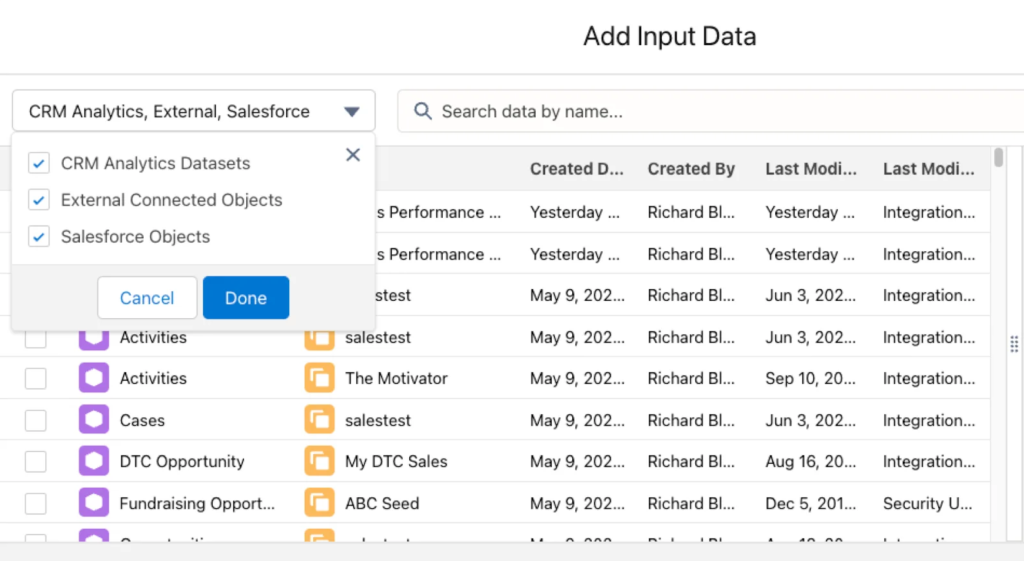
Image Source: Salesforce Trailhead Extract Salesforce Data into CRM Analytics
Q7: How to Display Data in One Field Based on the Value of Another Field in Salesforce Wave Einstein?
We can display data in one field based on the value of another field with Salesforce formula fields. To display data from formula fields in Salesforce CRM Analytics, you can use a combination of transformations and formula expressions within CRM Analytics. This involves creating a calculated column using formula transformations in your recipe or dataflow.
- Access Your Data: Go to the data manager in CRM Analytics.
- Select or Create a Recipe/Dataflow: Choose an existing recipe or dataflow, or create a new one.
- Add a New Transformation: In the recipe, add a transformation step.
- Create a Formula Field: Use the formula transformation to create a calculated column. Here, you can input your formula expression, which could replicate the logic of your Salesforce formula field.
- Configure the Formula: Define your formula based on the existing fields and the desired calculation.
- Save and Run: Save the transformation and run your recipe or dataflow to apply the changes.
This approach allows you to replicate the logic of formula fields directly within CRM Analytics, enabling dynamic calculations based on your existing data.
Related Resources:
- Salesforce Trailhead Extract Salesforce Data into CRM Analytics
- Salesforce Help Formula Transformation: Create a Calculated Column Based on an Expression
- Salesforce Help Explore Multiple Datasets with a Single Query
- Salesforce Help Stacked Bar Charts
Enhancing Email Privacy in Salesforce With Einstein Activity
Einstein Activity Capture (EAC) in Salesforce is a valuable tool that enhances productivity by synchronizing data between Salesforce and your email/calendar applications. It focuses on three key data types: emails, events, and contacts. Emails are automatically added to Salesforce’s activity timeline for insightful analysis but are not stored as Salesforce records. EAC links emails to Salesforce records based on specific criteria. When events and contacts are moved from connected email/calendar apps to Salesforce, they become Salesforce records, making them accessible for standard reporting and analytics within the Salesforce platform. EAC includes an Activities dashboard, developed on Tableau CRM, which provides a summary of sales activities. However, it’s important to note that EAC does not capture or store email and event attachments in Salesforce.
Insight:
How to Enable Einstein Activity Capture in Salesforce – an article where detailed information about all activities – events, contacts, and emails, that can be synchronized with Salesforce Einstein Activity Capture.
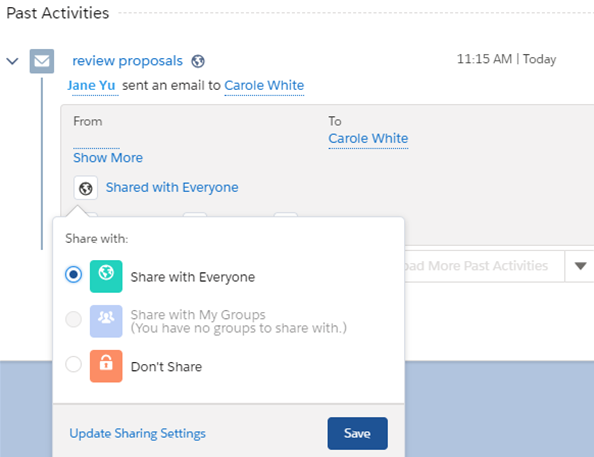
Image Source: Salesforce Help Control How Activities Added by Einstein Activity Capture Are Shared
Q8: How to Set Emails to Private in Einstein Activity Sync Salesforce Inbox?
To set emails to private in Einstein Activity Sync Salesforce Inbox, follow these steps:
- Access Salesforce Settings: Navigate to the settings in your Salesforce account.
- Select Einstein Activity Capture: Find the option for Einstein Activity Capture within the settings.
- Go to Sharing Settings: In the Einstein Activity Capture settings, look for ‘Sharing Settings’.
- Change Sharing Settings: Click on ‘Change’ to modify the sharing settings. Here, you will have options for how email data is shared.
Related Resources:
- Salesforce Help Sync Emails and Activities
- YouTube Einstein Activity Capture Basics in Salesforce
- YouTube Close Deals Faster with Einstein Activity Capture
- Salesforce Help Admin Setup for Einstein Activity Capture
- Salesforce Help Guidelines for Using Emails with Einstein Activity Capture
- YouTube How To: Integrate Outlook with Salesforce!
- Salesforce Help Control Email Data with Einstein Activity Capture
Einstein GPT in Salesforce
Einstein GPT in Salesforce seamlessly integrates AI models with CRM data, enhancing Salesforce applications across sales, service, marketing, and app development with AI-generated content. It merges Salesforce’s AI models with OpenAI’s ChatGPT, enabling robust generative AI capabilities. Key features include real-time data integration, Einstein Copilot for natural language interaction, and Copilot Studio with tools for custom AI actions. The suite also includes various CRM enhancements, and the Einstein GPT Trust Layer ensures data privacy. This integration significantly boosts productivity and enriches customer experiences in CRM.

Image Source: Salesforce News & Insights
Q9: How to Use Einstein GPT in Salesforce?
To use Einstein GPT in Salesforce, here’s a summarized guide:
- Integration: Einstein GPT integrates public and private AI models with Salesforce CRM data, allowing for natural-language prompts and AI-generated content adaptation.
- Salesforce Copilot: Integrated into Salesforce UI, Copilot engages users with conversational AI, providing multi-step action plan suggestions.
- Copilot Studio: Includes tools like Prompt Builder for personalized content generation, Skills Builder for custom AI-driven actions, and Model Builder for AI model integration and data privacy.
- Einstein GPT Trust Layer: Ensures enterprise AI security by preventing large-language models from retaining sensitive customer data, and maintaining data governance.
- Flexible Use Cases: Einstein GPT supports diverse applications across sales, service, marketing, commerce, and app development.
- Real-time Data Utilization: Feeds real-time data from Salesforce clouds and Data Cloud for informed AI outputs.
- External Model Integration: Offers “bring your own model” capability for additional flexibility.
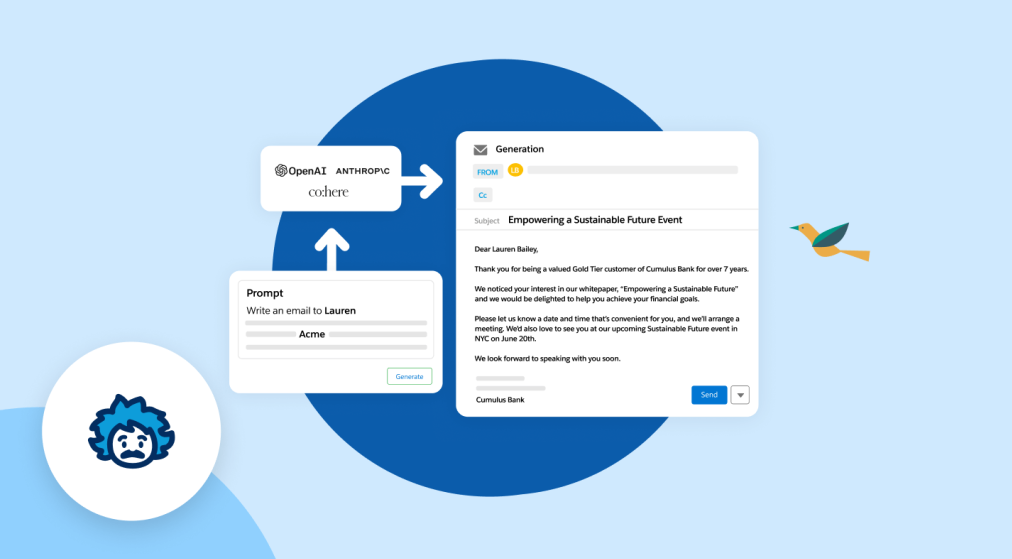
Image Source: Salesforce News & Insights
Related Resources:
- Salesforce News & Insights Explaining the Einstein Trust Layer
- YouTube Build The Future of Business with Einstein GPT
- YouTube Einstein GPT Trust Layer…How it Works and Why It Matters
- Salesforce Help Personalize Sales Emails with Einstein GPT for Sales
- Salesforce Products Say Hello to Einstein GPT
- Salesforce AI Research
Activating Einstein Analytics for Users
CRM Analytics, previously known as Tableau CRM and originally Einstein Analytics was developed to address specific analytical challenges in CRM.
Insight:
If you are looking for similar apps, information about the comparison of two powerful BI tools can be found in Tableau vs Qlikview vs Power BI.
CRM Analytics, which used to be called Tableau CRM, and before that Einstein Analytics, is a powerful tool in Salesforce for checking data and making smart business choices. It mixes data from Salesforce with data from other places, letting you look at a lot of information and predict trends. It’s great for using phones, so your team can see important info anywhere. What makes CRM Analytics special is that it can put together data from different places into one report. This is better than usual Salesforce reports because you can work together with your team on it in real-time.
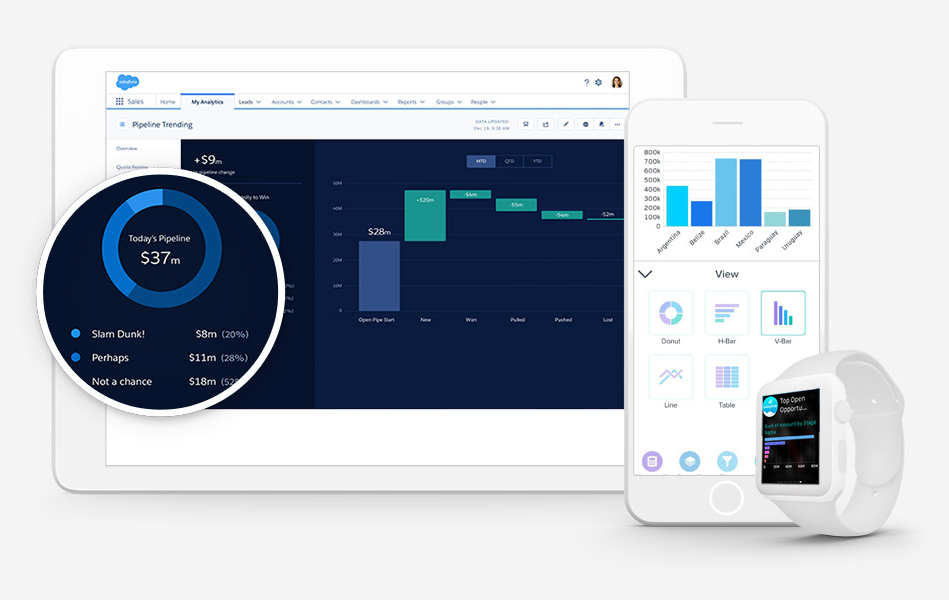
Image Source: Salesforce Products, CRM Analytics
Q10: How to Enable Salesforce Einstein Analytics for Users?
To activate CRM Analytics for users in Salesforce, follow these steps:
- Access Setup: Click on ‘Setup’ in your Salesforce account.
- Navigate to Analytics: Select ‘Analytics’ and then choose ‘Getting Started’. If the “Launch CRM Analytics” button is visible, CRM Analytics is already active in your org. If not, you’ll need to enable it.
- Enable CRM Analytics: Click on ‘Enable CRM Analytics’.
This process allows you to unlock the advanced data visualization and analytics capabilities of CRM Analytics in your Salesforce environment. Make sure your org has the appropriate licenses and that you have the ‘Customize Application’ permission before beginning this process. For more details and assistance, you can refer to Salesforce’s Help and Training Community here.
Related Resources:
- YouTube CRM Analytics (formerly Einstein Analytics): An Intelligent Experience for Your Organization
- YouTube What is CRM Analytics? | Salesforce
- Salesforce Products, CRM Analytics
- Salesforce Hub, CRM Analytics
- Salesforce Products, CRM Analytics, Pricing
Got another Salesforce Einstein-related question unanswered? Feel free to get in touch with us with your inquiry!

Dorian is a 6X Certified Salesforce Developer and Administrator with a start in the IT world as a CRM Admin in 2020. Since diving into Salesforce in 2021 via Trailhead and Focus on Force, he has achieved a Ranger Rank, earned several Superbadges, and bagged certifications including the Salesforce Certified Administrator, Platform App Builder, Associate and Platform Developer I by 2023. In 2024 he also became Salesforce Certified AI Associate and earned Certified AI Specialist Certification in 2025. Dorian is very keen on continuous learning, always looks for fresh ways to improve his knowledge. He enjoys running, boxing, kickboxing and reading diverse kinds of books in his free time.


 Previous Post
 Next Post
5 Responses to “10+ Salesforce Einstein FAQs”